 The home of cut to size foam
 FAST DELIVERY
 Home
Home


How to Use Foam for DIY Planters and Green Walls
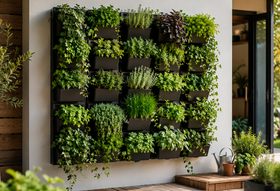
Foam can be useful in garden projects when it is used as a lightweight support, spacer or decorative base. It can help reduce the amount of heavy filler in a large planter and can be shaped to create vertical displays.
However, foam should not be treated as a replacement for proper drainage, a waterproof liner or a suitable growing medium. Choose clean material and keep it separated from edible crops unless its suitability has been confirmed.
Benefits of Foam in Garden Projects
- it is lightweight and easy to shape
- it can fill unused space in a deep decorative planter
- closed-cell foam does not readily absorb water
- it can support non-living decorative features
- sheets can be cut to line or protect selected surfaces
Choosing a Suitable Foam
Closed-cell polyethylene or EVA foam is generally more suitable around damp conditions than absorbent upholstery foam. Open-cell foam can hold water and may become difficult to clean.
Use new, clean foam with a known composition. Avoid painted, contaminated or crumbling waste foam. The material should not obstruct drainage holes or sit where it can be exposed to heat or flame.
How to Make a Lightweight Decorative Planter
Materials
- a sturdy outer planter
- waterproof liner if required
- pieces of clean closed-cell foam
- drainage layer or inner plant pots
- suitable compost
- hand tools and a sharp cutting knife
Steps
1. Check that the outer container is strong and has a safe drainage arrangement.
2. Cut foam blocks to occupy unused space at the bottom or around an inner pot.
3. Keep all drainage channels open.
4. Place a rigid separator or inner planting container above the foam.
5. Add compost only to the depth needed by the plants.
6. Water carefully and confirm that excess water can escape.
This approach works best for large decorative containers holding smaller removable plant pots. Do not allow a top-heavy planter to become unstable.
Creating a Simple Green Wall
A green wall needs a secure frame, a reliable watering system and a way to prevent moisture reaching the building surface. Foam may be used as a spacer, protective pad or shaped display element, but the plants still need appropriate containers or growing pockets.
Basic Steps
1. Fix a moisture-resistant backing system to a structure capable of carrying the wet weight.
2. Add a suitable waterproof barrier and drainage route.
3. Install plant pockets, pots or modules.
4. Use closed-cell foam only where a lightweight spacer or protective layer is needed.
5. Fit irrigation and test for leaks before planting.
6. Add plants gradually and monitor water distribution.
Never attach a wet green wall directly to untreated plaster or timber.
Plants for a Green Wall
Choose plants according to light, temperature and watering conditions. Ferns, trailing foliage plants, herbs and compact flowering plants may work in suitable environments, but not every species will tolerate the same position.
Group plants with similar watering needs. Indoor green walls also need good air circulation and regular checks for pests.
Maintenance
Inspect drainage, fixings and liners regularly. Remove standing water and replace any foam that becomes damaged or contaminated. Trim roots and foliage before they interfere with neighbouring pockets or irrigation lines.
A Sensible Approach to Sustainability
Reusing clean foam can be practical when it replaces unnecessary filler and can later be removed intact. It is less helpful when small pieces are mixed permanently into soil, where recovery becomes difficult.
EasyFoam supplies closed-cell and other foam materials cut to size. Discuss the intended environment with our team before selecting foam for an outdoor or moisture-exposed project.
EasyFoam.co.uk | Page