 The home of cut to size foam
 FAST DELIVERY
 Home
Home


How to Install Studio Foam: A Step-by-Step Guide
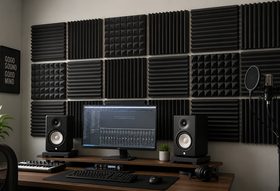
Studio foam is used to control reflections, echo and reverberation within a room. Correct placement can make speech and recordings clearer, while poor placement may leave the main problem areas untreated.
Before fixing anything permanently, remember that acoustic foam improves the sound inside a space. It does not provide the same noise isolation as a properly constructed soundproof wall.
What Is Studio Foam?
Studio foam is generally an open-cell acoustic material manufactured in flat, wedge or convoluted profiles. The open structure allows sound energy to enter the material, where some of it is converted into a small amount of heat through friction.
It is commonly used in recording rooms, vocal booths, podcast spaces, rehearsal rooms and home cinemas.
Where Should Acoustic Foam Go?
Start with the first reflection points rather than covering every available surface. In a listening or mixing position, these are commonly on the side walls, front wall and ceiling between the speakers and listener.
Corners may need thicker treatment, particularly where low-frequency build-up is noticeable. Bass traps are designed for this role and are normally deeper than standard wall tiles.
A useful approach is to place panels temporarily and listen before making the installation permanent.
What You Will Need
- acoustic foam panels
- tape measure, pencil and spirit level
- clean cloth
- foam-safe spray adhesive, removable strips or suitable hook-and-loop fixings
- backing boards if you want removable panels
- dust sheets and appropriate protective equipment
The fixing method must suit both the foam and the wall. Check the condition of paint and plaster before using adhesive.
Step-by-Step Installation
1. Plan the Layout
Measure the room and sketch the intended panel positions. Aim for balanced treatment on the left and right sides of a listening area.
2. Prepare the Surface
The wall should be clean, dry and free from dust. Flaking paint or damp surfaces need attention before any panels are installed.
3. Mark Light Guide Lines
Use a level to mark the corners or centre line of each panel. Avoid heavy pencil marks that may remain visible.
4. Test the Fixing Method
Try the adhesive or removable fixing on a small hidden area. Confirm that it does not attack the foam or damage the wall finish.
5. Attach the Panels
Apply the fixing evenly, following the manufacturer's instructions. Press the foam gently across the panel rather than crushing the profile.
6. Check Alignment
Stand back after fitting each row. Small errors can become more obvious as the installation grows.
7. Listen and Adjust
Once the initial panels are installed, test the room with speech, music or recordings. Add treatment gradually where reflections remain obvious.
Removable Installation Options
For rented rooms, attach the foam to lightweight backing boards and mount the boards with suitable removable fixings. This also makes panels easier to rearrange and can create a cleaner edge.
Free-standing panels are another useful option when walls cannot be altered.
Common Mistakes
Do not use an adhesive without checking foam compatibility. Avoid placing all the treatment on one wall, and do not block ventilation, electrical fittings or fire-safety equipment.
Very thin foam will mainly affect higher frequencies. A room with strong low-frequency problems may need deeper treatment and professional acoustic advice.
EasyFoam supplies flat and profiled acoustic foam that can be cut to suit your studio layout. Careful planning and a tidy installation will help you get more useful treatment from the material you buy.
EasyFoam.co.uk | Page